In order to fully utilise the UniFi APs full feature set, you’ll need to have a UniFi controller of some sort. This can be a UniFi Cloud Key, a UniFi Cloud Gateway, or… you can host one yourself. So obviously, I chose the third option.
There are two methods for installing the controller. One is on Docker, or you can use a Bare-Metal install. I’ll go through both, but I personally use the Docker setup.
Docker
Well, in order to do this, you obviously need to have Docker installed - if not, see here for how to do that.
Compose file
version: "3.9"
name: unifi

services:
  unifi-db:
    container_name: unifi-db
    image: mongo:3.6
    environment:
      - TZ=Etc/UTC
    volumes:
      - /srv/unifi/db:/data/db
      - /srv/unifi/init/init-mongo.js:/docker-entrypoint-initdb.d/init-mongo.js:ro
    networks:
      - unifi
    restart: unless-stopped
    healthcheck:
      test: ["CMD", "mongo", "--eval", "db.adminCommand('ping')"]
      interval: 10s
      timeout: 5s
      retries: 5

  unifi-network-application:
    container_name: unifi-network-application
    image: lscr.io/linuxserver/unifi-network-application:latest
    depends_on:
      unifi-db:
        condition: service_healthy
    environment:
      - MONGO_DBNAME=unifi-db
      - MONGO_HOST=unifi-db
      - MONGO_PORT=27017
      - MONGO_USER=unifi
      - MONGO_PASS=pass
      - PGID=1000
      - PUID=1000
      - TZ=Etc/UTC
    ports:
      - 3478:3478/udp
      - 10001:10001/udp
      - 8080:8080
      - 8443:8443
      - 8843:8843
      - 6789:6789
    volumes:
      - /srv/unifi/network-application:/config
    networks:
      - unifi
      - proxy
    restart: unless-stopped

networks:
  unifi:
    driver: bridge
    ipam:
      config:
        - subnet: 172.28.0.0/16
  proxy:
    external: true
/srv/unifi/init/init-mongo.js
db.getSiblingDB("unifi-db").createUser({
  user: "unifi",
  pwd: "pass",
  roles: [{ role: "dbOwner", db: "unifi-db" }]
});

db.getSiblingDB("unifi-db_stat").createUser({
  user: "unifi",
  pwd: "pass",
  roles: [{ role: "dbOwner", db: "unifi-db_stat" }]
});
You can change the password by changing pass to a value of your preference.
After this, run docker compose up -d in the directory you have placed the compose file in, and it should start running.
Now head to setup:
Bare-metal
This only works on Debian or Ubuntu machines, credit to https://community.ui.com/user/AmazedMender16/ed097858-e875-46ba-b9ea-7c65e2747440, for his script to do so.
Install pre-requisites
Ensure the ca-certificates package is installed.
sudo apt-get update; sudo apt-get install ca-certificates curl -y
Download and execute script
curl -sO https://get.glennr.nl/unifi/install/install_latest/unifi-latest.sh && sudo bash unifi-latest.sh
Examples (if exposing directly)
curl -sO https://get.glennr.nl/unifi/install/install_latest/unifi-latest.sh && sudo bash unifi-latest.sh --email hello@848226.xyz --skip --fqdn unifi.848226.xyz
Exposing
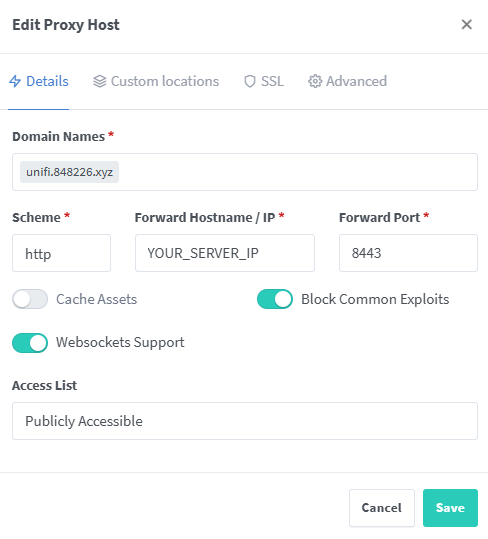
With NGINX Proxy Manager
You will need to create a new Proxy Host.
Details
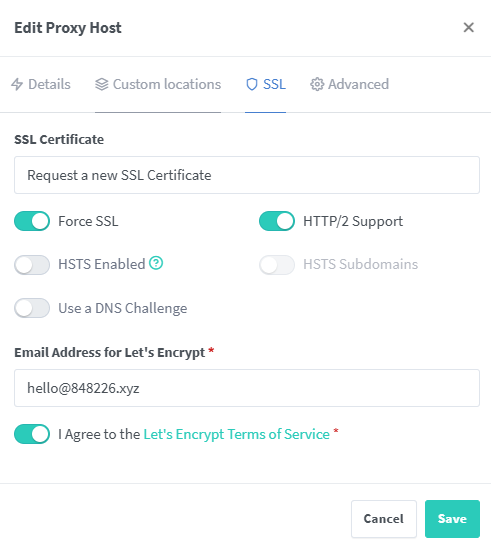
SSL
Advanced
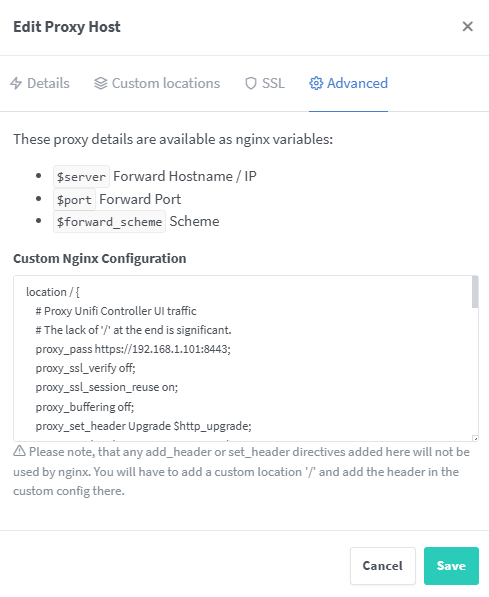
location / {
    # Proxy Unifi Controller UI traffic
    # The lack of '/' at the end is significant.
    proxy_pass https://YOUR_SERVER_IP:8443;
    proxy_ssl_verify off;
    proxy_ssl_session_reuse on;
    proxy_buffering off;
    proxy_set_header Upgrade $http_upgrade;
    proxy_set_header Connection "upgrade";
    ## Specific to Unifi Controller
    proxy_hide_header Authorization;
    proxy_set_header Referer '';
    proxy_set_header Origin '';
}

location /inform {
    # Proxy Unifi Controller inform endpoint traffic
    # The lack of '/' at the end is significant.
    proxy_pass https://YOUR_SERVER_IP:8080;
    proxy_ssl_verify off;
    proxy_ssl_session_reuse on;
    proxy_buffering off;
    proxy_set_header Upgrade $http_upgrade;
    proxy_set_header Connection "upgrade";
    ## Specific to Unifi Controller
    proxy_hide_header Authorization;
    proxy_set_header Referer '';
    proxy_set_header Origin '';
}

location /wss {
    # Proxy Unifi Controller UI websocket traffic
    # The lack of '/' at the end is significant.
    proxy_pass https://YOUR_SERVER_IP:8443;
    proxy_http_version 1.1;
    proxy_set_header Upgrade $http_upgrade;
    proxy_set_header Connection "upgrade";
    ## Specific to Unifi Controller
    proxy_set_header Origin '';
    proxy_buffering off;
    proxy_hide_header Authorization;
    proxy_set_header Referer '';
}
Directly exposing
Expose the following ports in your firewall (only port forward if you are running your UniFi controller off-site from your UniFi devices):
- 3478
- 10001
- 8080
- 8443
- 8843
- 6789
Setup
Now you must go through the setup process for the UniFi controller. In order to adopt new UniFi devices to your self-hosted controller, follow the following steps:
Connect
SSH to your UniFi Device, using it’s IP Address, which can be found in your router’s dashboard:
ssh ubnt@YOUR_DEV_IP
with a default password of ubnt
Set the inform URL
Get your controller IP Address, or the hostname which you are exposing it on, and run the following command:
set-inform http://YOUR_UNIFI_CONTROLLER/inform
Complete adoption
Head to your controller, login, click UniFi Devices in the sidebar, and you should see your device waiting for adoption.
Final Thoughts
I think self-hosting the UniFi controller is a great way to be able to use UniFi devices without having to purchase a dedicated controller, especially if you already have the infrastructure and knowledge in order to do so.