The UniFi U7 Pros have these neat LED rings on them, but they can be pretty distracting during the night - so I thought it would be cool to be able to control them via Home Assistant, and automate them. And honestly, another set of lights to have control over - especially considering they seem to make pretty good night lights.
Setting up the APs
In order to control the AP LEDs, you will need to enable SSH. You can do this via the UniFi Controller.
But first, you need to generate an SSH Key.
Generating an SSH Key
You can do this, by following the steps below:
02:30:57 vivaan@ultimate ~ → ssh-keygen -t rsa
Generating public/private rsa key pair.
Enter file in which to save the key (/ultmt/home/vivaan/.ssh/id_rsa): ./unifi
Enter passphrase (empty for no passphrase):
Enter same passphrase again:
Your identification has been saved in ./unifi
Your public key has been saved in ./unifi.pub
The key fingerprint is:
SHA256:Bi9Oh3/y3Byyj4WxYf/GdOK+ZST5EdsVE2/FtA8sxQQ vivaan@ultimate
The key's randomart image is:
+---[RSA 3072]----+
|            E+o*+|
|             o. B|
|      .     . oo+|
|       +     . +*|
|      + S +   oo+|
|     o = . *  o+o|
|      . o = ++ o+|
|         = B o+o |
|          =.+o+. |
+----[SHA256]-----+
02:31:17 vivaan@ultimate ~ →
It is very important that you do not set a passphrase, otherwise Home Assistant will not be able utilise the key without requiring user input - which we do not want.
Now, to set up the key in the console
Setting up the Key in the console
Navigate to ‘UniFi Devices’
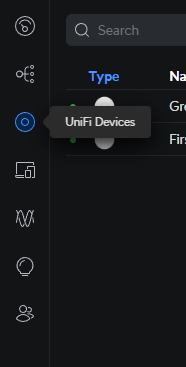
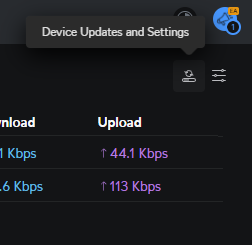
Click ‘Device Updates and Settings’ in the top left corner
This will open a menu. Scroll to the bottom to find the SSH section:
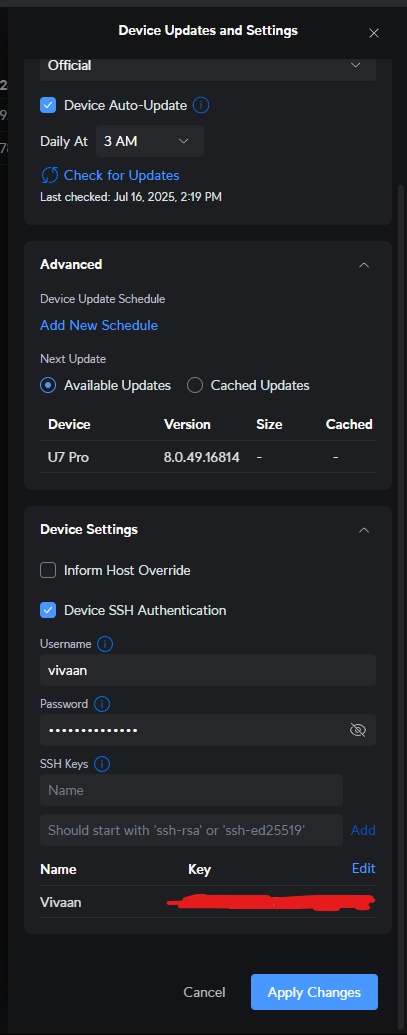
Add your SSH key that was generated previously. You can view your key by running
02:34:52 vivaan@ultimate ~ → cat test.pub
ssh-rsa AAAAB3NzaC1yc2EAAAADAQABAAABgQDJDoV11JhVxRwKTj8W7rRbZkdtO7EppdgsG+bjCa9vcMrNGeP/Fn6d+RE9kGgn8TtdX6/9093yteH4xJoYLJ6cdYprrR8YHStN4Gpt1oUPwivck6kjVY1U1xbkC16XW/YekFgm1f/6Wb4qJSgIK6vSRQojB0iHfX96ox4oKF3Ge7b+t/ZIjmTMLICpQEwV5Ne3UUv6huwcmR7SAKFXSIv4FnNl7tD0T7p/WhrJVa3C2szVZ5dpOd0UacOch6vHaFZWvhVCaVPwMBTK/RExUMv+2XjLWbpkFYe/Y6g9yRtXq3mxPCyYPBmr7ewu71KHuHIvLHTxvU6v2So5Blwlbb+ygSbTs0cbS1PpfrYYo+5g6gz24JzDgH6vf4bw4/Ial5FOjn1wmWfURrfnDBGrn/Nqj14WX91EIjkcz/1DY0ioRovso4SLMLCaPFeRqKfnDahJuyqPZAEqztUJ7qZ4MYxHWC2Ulj9v+hyx85Fuh0CR4WJQVuVOBG5L+ABEqOgx3xM= vivaan@ultimate
02:35:32 vivaan@ultimate ~ →
Don’t worry, I generated this key for the sole purpose of this guide. Regardless, it is a Public Key after all, so it should be fine.
Setting up Home Assistant
In order for Home Assistant to be able to SSH into the APs, it needs two things. The IP Address, and the SSH Private Key you generated before.
You can get your IPs from the UniFi console, and you can get your private key by running the following:
02:35:32 vivaan@ultimate ~ → cat unifi
-----BEGIN OPENSSH PRIVATE KEY-----
b3BlbnNzaC1rZXktdjEAAAAABG5vbmUAAAAEbm9uZQAAAAAAAAABAAABlwAAAAdzc2gtcn
NhAAAAAwEAAQAAAYEAyQ6FddSYVcUcCk4/Fu60W2ZHbTuxKaXYLBvm4wmvb3DKzRnj/xZ+
nfkRPZBoJ/E7XV+v/dPd8rXh+MSaGCyenHWKa60fGB0rTeBqbdaFD8Ir3JOpI1WNVNcW5A
tel1v2HpBYJtX/+lm+KiUoCCur0kUKIwdIh31/eqMeKChdxnu2/rf2SI5kzCyAqUBMFeTX
t1FL+obsHJke0gChV0iL+BZzZe7Q9E+6f1oayVWtwtrM1WeXaTndFGnDnIerx2hWVr4VQm
lT8DAUyv0RMVDL/tl4y1m6ZBWHv2OoPckbV6t5sTwsmDwZq+3sLu9Sh7hyLyx08b1Or9kq
OQZcJW2/soEm07NHG0tT6X62GKPuYOoM9uCcw4B+r3+G8OPyGpeRTo59cJln1Ea35wwRq5
/zao9eFl/dRCI5HM/9Q2NIqEaL7KOEizCwmjxXkain5w2oSbsqj2QBKs7VCe6meDGMR1gt
lJY/b/ocsfORbodAkeFiUFblTgRuS/gARKjoMd8TAAAFiHZSktZ2UpLWAAAAB3NzaC1yc2
EAAAGBAMkOhXXUmFXFHApOPxbutFtmR207sSml2Cwb5uMJr29wys0Z4/8Wfp35ET2QaCfx
O11fr/3T3fK14fjEmhgsnpx1imutHxgdK03gam3WhQ/CK9yTqSNVjVTXFuQLXpdb9h6QWC
bV//pZviolKAgrq9JFCiMHSId9f3qjHigoXcZ7tv639kiOZMwsgKlATBXk17dRS/qG7ByZ
HtIAoVdIi/gWc2Xu0PRPun9aGslVrcLazNVnl2k53RRpw5yHq8doVla+FUJpU/AwFMr9ET
FQy/7ZeMtZumQVh79jqD3JG1erebE8LJg8Gavt7C7vUoe4ci8sdPG9Tq/ZKjkGXCVtv7KB
JtOzRxtLU+l+thij7mDqDPbgnMOAfq9/hvDj8hqXkU6OfXCZZ9RGt+cMEauf82qPXhZf3U
QiORzP/UNjSKhGi+yjhIswsJo8V5Gop+cNqEm7Ko9kASrO1QnupngxjEdYLZSWP2/6HLHz
kW6HQJHhYlBW5U4Ebkv4AESo6DHfEwAAAAMBAAEAAAGAHsJ4e6L3XWPnGtKGx3DkqfkXY2
hW/eqwDGuGYuTH8NI+TKux3IRqAawpzZPqw3WeIfZyO/Cui6P0+vTFKH6nE4POFhQp5iwM
RIFZdw1zVQpdYIU8wrmjgj/X8jKlGZ4JpPpraiGiZIBXXiZKHhnkUyqZ1usV1xjFqJMNGZ
K3ahbiU8z8QnR6ilwioQJDwbO9pv+qkp0SwXtRokpTZMGmHGH+7LDhSgdqnnJAF95iU6Xa
4alUGlaucqGNukRtbPgSu/juFDkbfe/KHLlI2ZqVIC9QoyGemTAMhKw+fnfD3F/VOn+X9j
LpfR8PLjP9+WuF5f6z9IWiKelz0u5vvnIP9lHDGOxzOgo+e6e7gB181VjhkLgawz4JFQxV
sZ54S05qrT1nBVtarIGQe4gEt9kGdn7cdLfnAUl+Ch2nKFxD9tCib7EaTYHLEJWvEE5EUA
N2YJwZFdDITo5/21OkXggKwm4jg3n8skw0I2Qc604tiQRvqUNqzaa3gI4SIkz0jlatAAAA
wH9sJ0lUErz7t9TvNSXQcOxwZTFmIZKkV4URceSr4qRLdK97o9o2dyQmVZjIJcI9AU8DbH
WeBTWzGZqowbP9G+dsPQzTwBVNiLuNrJTaul1cb9sOCo3RTsKrhmvvWjKv0im87m3J4TlV
v+CsANQk2DCWOehCcaFVkVLwDRY6rgjbu15UJN5z+57A/MfFp8qyouAZ1A733MbrgT68We
A8UdFRu2RC9bq/6/6DarUPGH2j9becIAuax71hbSBoUcFc6wAAAMEA7kkpjvYnWFGoqmbT
KnoBbC6i7cQRZb0qJyJPqY3nfFWzD6+YIp9xb0vaFSjCRKKgJjBbP2YGMqY91PzZCRkdI/
MkOSt91J4WORDrfdcXJATOW3WnC/+EH4r6o++aizCi5SS741pDUA/+DEF0nxjHAv2wU8yx
Bp2ovUmJ+1614sDm6NEvmZd8t71hNf5Y7wEMdEgwWcEmfnGeV6Or6YVGtQTiiLhnHf4qOx
EMQymzp/l6azM9S4aEZCxTu617S7/VAAAAwQDYANlxAo7uDw9rRYhd8b9iB5yZD+CosXSX
/kSvFayljxssRViAhHknhEEFvbmM0px3wRVqCzr38VMmDP4qso7clq426i8csIVzTIgVhY
sD6iLgXRIZlCUvudsU8fG3pf8hpwbqnyF0xfz9T6f3qXFUHi84Qc7tcs+GTczCUdn3aOOF
xHfHojN0LVgsN73pndBdXwTVSxIle1GJDuVsxK+e8OFTppaunjg0HIJMkVjMFbgUpyitnz
DxNxVs2yFxf0cAAAAPdml2YWFuQHVsdGltYXRlAQIDBA==
-----END OPENSSH PRIVATE KEY-----
02:37:37 vivaan@ultimate ~ →
Again, I generated this key for the sole purpose of this guide, so it isn’t much of an issue putting it on the internet, as nothing actually uses it.
You should never ever give your private key to anyone else.
Doing stuff in Home Assistant
Navigate to your Home Assistant config folder.
02:40:44 vivaan@ultimate data → cd /clstr/homeassistant/data
02:40:47 vivaan@ultimate data → ls -a
.            automations.yaml    deps                      home-assistant_v2.db-shm  scenes.yaml   zigbee.db
..           backups             go2rtc-1.8.4              home-assistant_v2.db-wal  scripts.yaml  zigbee.db-shm
.HA_VERSION  blueprints          home-assistant.log        integrations              secrets.yaml  zigbee.db-wal
.cloud       configuration.yaml  home-assistant.log.1      lldap-ha-auth.sh          themes
.ssh         core                home-assistant.log.fault  lovelace-cards-temp-vm    tts
.storage     custom_components   home-assistant_v2.db      media                     www
02:40:48 vivaan@ultimate data →
As you can see, I have created a .ssh folder. In this folder, place your SSH key, named id_rsa .
02:40:48 vivaan@ultimate data → ls ./.ssh
id_rsa
02:41:25 vivaan@ultimate data →
Next up, open your configuration.yaml file. (or if you’re using a modular structure like me - stay posted for a guide to do that - then open your integrations folder, and create a new file named shell_command.yaml )
02:43:59 vivaan@ultimate data → cd integrations/
/clstr/homeassistant/data/integrations
02:44:03 vivaan@ultimate integrations → cat shell_command.yaml
shell_command:
  AP_NAME_led_on: ssh -o StrictHostKeyChecking=no -i ./.ssh/id_rsa USERNAME@IP "echo 1 >/proc/gpio/led_pattern ; sed -i '/mgmt.led_enabled=false/c\mgmt.led_enabled=true' /var/etc/persistent/cfg/mgmt"
  AP_NAME_led_off: ssh -o StrictHostKeyChecking=no -i ./.ssh/id_rsa USERNAME@IP "echo 0 >/proc/gpio/led_pattern ; sed -i '/mgmt.led_enabled=true/c\mgmt.led_enabled=false' /var/etc/persistent/cfg/mgmt"
02:44:08 vivaan@ultimate integrations →
Repeat the following section for any other APs you have (if you have more then one) and ensure you set the USERNAME and IP .
  AP_NAME_led_on: ssh -o StrictHostKeyChecking=no -i ./.ssh/id_rsa USERNAME@IP "echo 1 >/proc/gpio/led_pattern ; sed -i '/mgmt.led_enabled=false/c\mgmt.led_enabled=true' /var/etc/persistent/cfg/mgmt"
  AP_NAME_led_off: ssh -o StrictHostKeyChecking=no -i ./.ssh/id_rsa USERNAME@IP "echo 0 >/proc/gpio/led_pattern ; sed -i '/mgmt.led_enabled=true/c\mgmt.led_enabled=false' /var/etc/persistent/cfg/mgmt"
Restart Home Assistant:
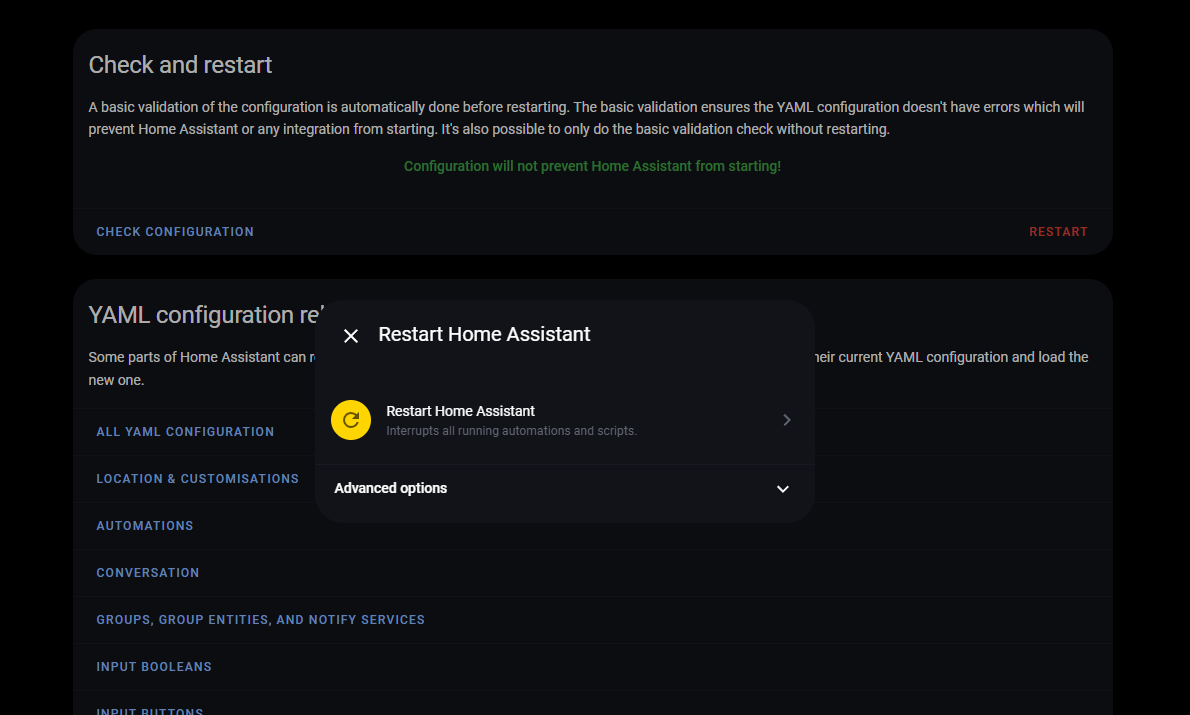
And you should end up with two (or more, but two per AP) new actions showing up.
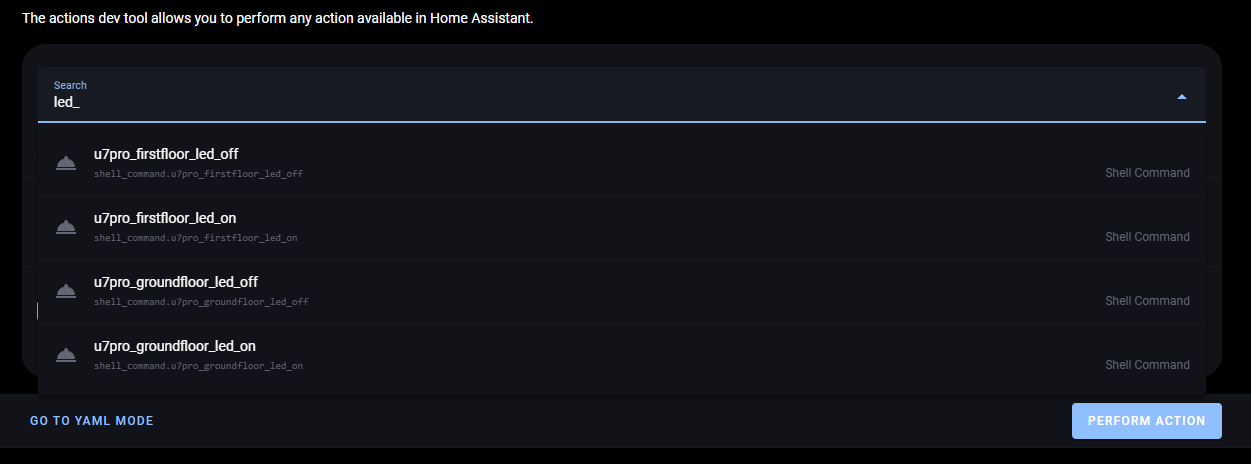
You can use these in automation, like any standard action. For example, here’s mine to turn off the upstairs AP LED at 9, and back on at 7:
alias: Unifi - Automatic LED Toggle
description: ""
mode: single
triggers:
  - at: "21:00:00"
    id: night
    trigger: time
  - at: "07:00:00"
    id: day
    trigger: time
conditions: []
actions:
  - choose:
      - conditions:
          - condition: trigger
            id:
              - night
        sequence:
          - data: {}
            action: shell_command.u7pro_firstfloor_led_off
      - conditions:
          - condition: trigger
            id:
              - day
        sequence:
          - data: {}
            action: shell_command.u7pro_firstfloor_led_on
Thanks for reading! Stay tuned for my Home Assistant config structure, and to find out what themes and dashboards I use.